
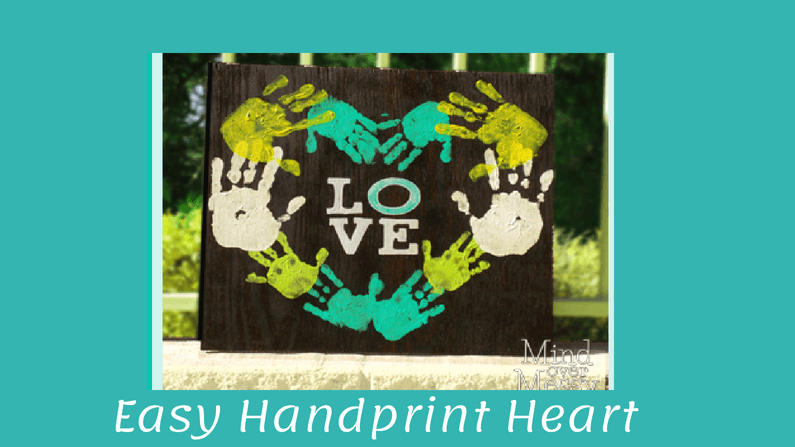

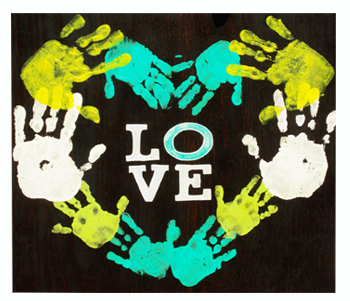
I really wanted to make something as a family to spruce up my plain, boring, white fireplace mantel. I decided a heart made from our hand prints would be such a nice way to both memorialize this year and add a little personality to the room. I am so happy with the way it turned out and seeing the word “LOVE” in the living room with the hand prints has such a nice feeling of togetherness (which is a great focal point when fights break out between the boys!).
TO MAKE THE HEART:
SUPPLIES:
- Wood – This example is inexpensive wood cut into 18×20 inches.
- Paint – This is Artist’s Loft acrylic paint (I bought the least expensive acrylic paint I could find and used Michaels phone app coupon to get 40% off)
- Varnish – spray, wax, or polyurethane
- Foam Paint brushes
- Paint Pen
- Pencil
- Liquitex Glazing Medium (optional)
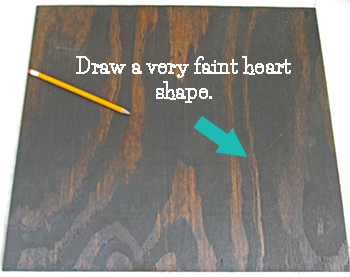
FIRST STAIN OR PAINT THE WOOD:
Lightly sand the wood, then paint or stain it. I used this MinWax Espresso finish wood stain that I had on hand and stained the wood with two coats. It’s best if this stain can dry for 24 hours before you begin because it tends to stay wet.
Draw a faint heart with a pencil to act as a guide. Pencil tends to show through paint so you want it to be just enough to see, but not enough to show on your final project.
TIME TO GET YOUR HANDS MESSY:
Add a little artist’s glazing medium to the paint so it will go on easier and take longer to dry, but not too much or it will change the color and make it look transparent. I used about a quarter amount of medium as the amount of paint.
Making sure you have the creases where the fingers and hand connect is very important. Once you place each hand, push down gently paying extra attention to the fingers and finger tips. Lift hands straight up–especially the kids since they wiggle!
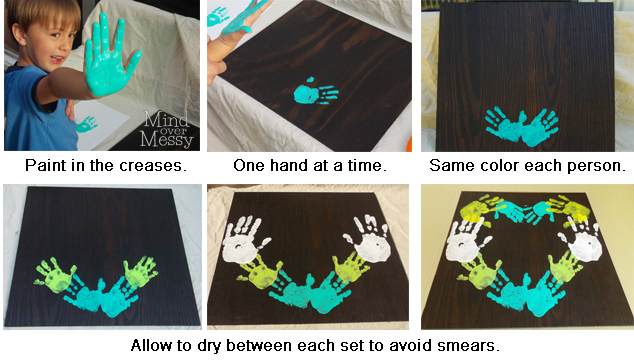
Allowing time to dry between each set of prints is helpful, but not necessary. Acrylic paint dries relatively fast so it is worth taking this extra step if you are very picky (like me!), but you could get away with doing it all at the same time if you do not want to wait.
Here is our first attempt where we did not wait and also had some floating fingers:
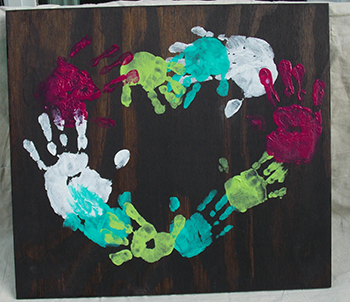
Unfortunately the magenta on this first try did not show up when it was up on the fireplace mantel, but you can see that you can also alternate the color of hand prints instead of having it be symmetrical. From far away, you could not tell it was a heart so I flipped the board over and did a second attempt.
TIP: If you get some paint drops around your hand prints, water it down right away, wipe gently, and it will usually come off. Although you may decide some splattered paint adds to the look!
If your prints come out too light in areas, water down the paint and you can go over the hand print with the watered down paint and a paint brush to darken it.
If you are not used to working with acrylic paint, clean up is easy. Wash your hands thoroughly with soap and water and rinse your brush after. Of course I walked the boys (six and four) carefully to the bathroom so they could not touch anything on the way:)
TO ADD THE WORD LOVE:
Once your heart is done you can add a word. “Love” seemed like it would look great in the center and tie the whole thing together. I also thought “Family” would be nice but liked the idea of using the word “LOVE” as it is in my Mind Over Messy header. To add a word, simply print the words of your choice from your computer, use a stencil, or download the word “LOVE” that is shown in the example.
DOWNLOAD THE WORD LOVE HERE: LOVE
Thankfully, in this post The Happy Housie had a technique I’d long ago forgotten from my art classes. You can color the back of word with pencil, flip it over, trace the letters and you will be left with a faint outline of your words like this:
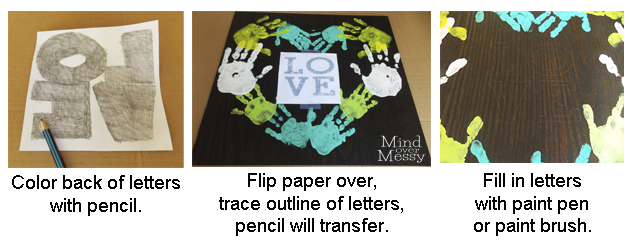
Paint in the letters. I used a fine point, white paint pen to outline them first, painted the letters L, V, E white with the paint pen and then added a light overcoat of acrylic. Lastly, I painted the “O” with teal, outlined it white with the paint pen, and then used white to dry brush over the top of the teal to tie it together. I sprayed a few coats of varnish after it was completely dry.
A word of caution: I sprayed too close with the varnish and the white hand print turned a little yellow. I was able to fix it with some watered down white paint and a paint brush, but next time I will hold the spray can back further. When I sprayed the back side with our practice prints pictured above, holding the can further back and allowing time for each coat to dry, the white did not take on a yellow tint.
ALL DONE:
I would love to see the creative combinations everyone else comes up with. Don’t forget to add the year on the back. Time flies!
 Welcome! Our modern lives can be so hectic that it is so helpful to find easier ways to get a healthy meal on the table, meditate even if the kids are loud, and stay active any way that we can fit it in. This blog is dedicated to making Mindful Living Easier.
I love this idea. What a great family craft!
Thanks Becky! It so nice when the easy things come out well:)
I like how well-written and informative your content is. You have actually given us, your readers, brilliant information and not just filled up your blog with flowery texts like many blogs today do. If you visit my website UY4 about Airport Transfer, I’m sure you can also find something for yourself.
It is always great to come across a page where the admin take an actual effort to generate a really good article. Check out my website 81N concerning about Airport Transfer.